Home IoT using Yocto
I’ve been working with Linux for all my career, but unfortunately, using Yocto has not been as big of a part of my work as I would have wished. For that reason I decided to do my next personal project using Yocto. Another thing I wished to do, is using Qt, as I haven’t worked with that either for a couple of years.
For my device, I used an ST stm32mp157-dk2 that I purchased about a year ago. Other tech used included Python and of course, some bash scripting.
The project
The problem I wanted to solve, was my issue with not doing my home chores etc. as persistently as I’d wish.
So, I decided to build a device that I can use for setting up periodic tasks, and marking them done.
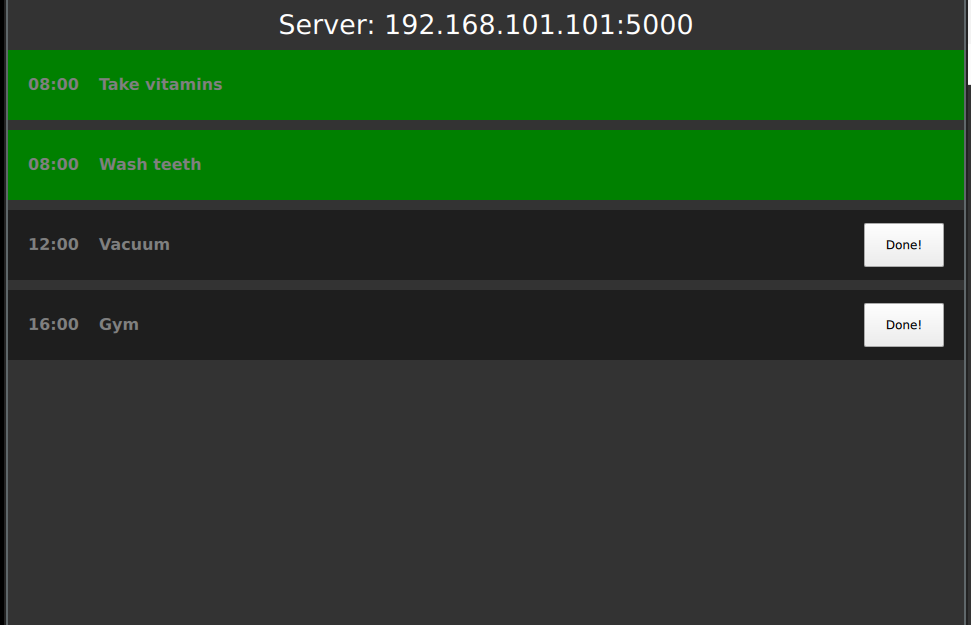
I began the work by creating a Qt6 project for the UI. I also added a simple REST API programmed using the Qt task, that is used for creating new tasks to be displayed. The UI ended up looking like this:
Another thing I added, was a web UI for adding those tasks from my local network. The ST device didn’t have a very good display for inputting text very well, so I opted not to add a way for creating tasks on that device itself.
I am not an expert in creating HTML and CSS scripts, so I found ChatGPT to be very useful for this. It was able to create a good enough CSS for the simple UI page.
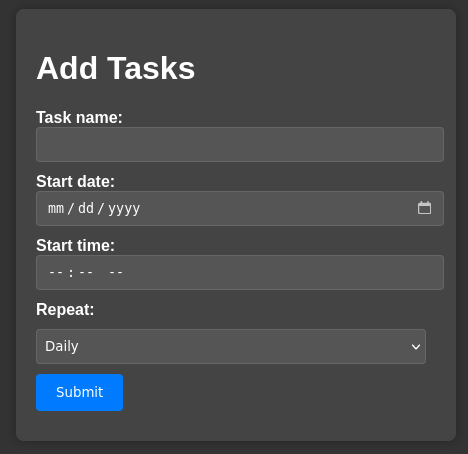
The UI back-end was coded with Python Flask and would forward the web interactions to the Qt6 web server.
Another thing I played around with, was the GitHub Actions for unit testing. It worked nicely, until I added some Qt features that I wasn’t quickly able to get running.
So, it worked pretty nicely until it didn’t. Oh well, there probably would have been a pretty simple way to get it back up working, but for a hobby project, I just left it failing.
Creating the Yocto layer
After I got the program roughly working on my desktop, it was time to start building the Yocto layers.
I started by adding the ST board support package, and poky layers, and fairly quickly was able to build the Poky distribution.
After that, I added the Qt6 layer. It wasn’t too easy to find out what I exactly needed to install to the image to get all the needed Qt features.
It took a couple of hours of Google, but eventually I found what was needed to get the program building.
Then I added some systemd services, and after a lot of Google again, I got the thing started automatically after boot.
This was a lot more difficult for me as I thought it would be. At first, I just wrote a service that launches the application.
But that didn’t work. The service, running as root, wasn’t able to launch the program in Weston. So, I configured it to use the weston user, and got the program displayed. I was so happy until I noticed that now the program doesn’t accept touch inputs. Man, I must have spent 3 or 4 weekends trying to learn about libinput, Qt6 input methods, wayland, all sorts of things that could be related.
Nothing worked. After many bottles of soda and frustrated Friday nights, I finally discovered that I was missing an image feature from my layer, I believe it was the qtwayland package. I added that, reverted back to the first version I had made, and there it is. The program starts and works like a charm. Great, that’s a lot of time wasted by not typing in 9 letters :D
Creating a layer for the web UI application was fairly simple too, the python packaging works really well on Yocto. Nothing much to say about that, just add inherit setuptools3 and you’re basically done.
Connecting to Wi-Fi
After I got both of my programs running, I was quite happy for about 15 minutes. Then I realized that I had no way to configure the Wi-Fi connection without being at least somewhat of a Linux user.
I had to access the device through a serial port or ssh to configure my Wi-Fi password every time I flashed by distro again.
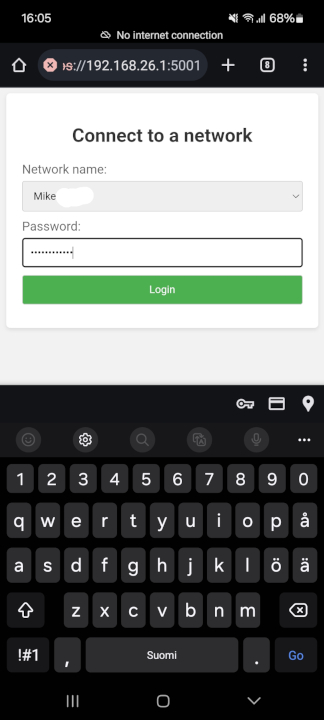
So, the next thing I wanted to build was some kind of a UI for selecting the SSID and setting the password.
I had previously done something like this using Bluetooth and a custom made Android application, but this time I didn’t want to do it like that. So, I crafted the following plan:
- On boot, create a Wi-Fi hot-spot from the ST device.
- Host a web UI there that lists the available networks and allows the user to select one.
- Connect to the network, close the AP and disable the Wi-Fi configuration service.
For this to work without being outrageously insecure, I decided that I’d need to use https instead of plain old http I used for the other web UI. So, I wrote a few scripts, couple of systemd services and another Flask based web page, and got the initial version working. And again, used ChatGPT for the CSS.
I initially thought ChatGPT is just a waste of space, but now that I realized I can use it to build pretty neat looking simple web pages, I’m starting to like it for that feature.
This part I ended up calling wificonfig-webui. So basically how the thing works, is that it creates a self signed certificate for the https, creates an access point, and hosts a web page there.
When an SSID and a password are set to the UI, it creates a wpa supplicant configuration file, and connects to the network.
Programs I used here were mainly hostapd and udhcpd.
I didn’t get my first version working too well yet, as I needed to run the configuration twice on most attempts to get the Wi-Fi connected. But, I think it’s good enough for now, after all it’s used in a single toy project of mine.
But this is something I might come back to at some point, I think having a solution for connecting headless IoT devices to a Wi-Fi is something I’ll be needing in the future too.
After finishing the that part, I was ready for now. Now I can track my daily tasks easily for a couple of days, until I decide to put my device back to the closet.
For me the end result isn’t often that important in these projects, I enjoy creating them a lot more than actually using them.